Leader Board

How to- Get-AXReport

Retrieves a list of Microsoft SQL Server Reporting Services reports available from Microsoft Dynamics AX.

Syntax

Parameter Set: Default

Get-AXReport [-OnlyName] [-ReportName <String> ] [-ServicesAOSName <String> ] [-ServicesAOSWSDLPort <Int32> ] [-ServicesFilePath <String> ] [ <CommonParameters>]


Detailed description

The Get-AXReport cmdlet retrieves a list of Reporting Services reports available from Microsoft Dynamics AX. The cmdlet returns values for ChangedBy, ChangedDate, CreatedBy, CreatedDate, DataSources, Designs, Name, and VsProjectNames.

Parameters

-OnlyName

Specifies that only report names will be returned by the cmdlet.

Aliases

none

Required?

false

Position?

named

Default Value

none

Accept Pipeline Input?

false

Accept Wildcard Characters?

false

-ReportName<String>

Specifies names of reports to query for in Microsoft Dynamics AX.

Aliases

none

Required?

false

Position?

named

Default Value

none

Accept Pipeline Input?

false

Accept Wildcard Characters?

false

-ServicesAOSName<String>

Specifies the name of a Microsoft Dynamics AX Application Object Server (AOS) instance to connect to instead of the default value.

Aliases

none

Required?

false

Position?

named

Default Value

none

Accept Pipeline Input?

false

Accept Wildcard Characters?

false

-ServicesAOSWSDLPort<Int32>

Specifies the web service (WSDL) port of an AOS instance to connect to instead of the default value.

Aliases

none

Required?

false

Position?

named

Default Value

none

Accept Pipeline Input?

false

Accept Wildcard Characters?

false

-ServicesFilePath<String>

Specifies a client configuration parameter file (.axc) to use instead of the configuration that is stored in the registry.

Aliases

none

Required?

false

Position?

named

Default Value

none

Accept Pipeline Input?

false

Accept Wildcard Characters?

false

<CommonParameters>

This cmdlet supports the common parameters: Verbose, Debug, ErrorAction, ErrorVariable, OutBuffer, OutVariable, WarningAction, and WarningVariable. For more information, see about_CommonParameters http://go.microsoft.com/fwlink/?LinkID=113216

Inputs

The input type is the type of the objects that you can pipe to the cmdlet.

  • None

You cannot pipe input to this cmdlet.

Outputs

The output type is the type of the objects that the cmdlet emits.

  • None

The cmdlet does not generate any output.

Examples

Example 1

This example returns detailed information for the AssetAddition report.

C:\PS>Get-AXReport -ReportName AssetAddition

ChangedBy : Admin
ChangedDate : 5/10/2011 12:00:00 PM
CreatedBy : Admin
CreatedDate : 5/10/2011 12:00:00 PM
DataSources : {}
Designs : {Report}
Name : AssetAddition
VSProjectNames : {}

Example 2

This example returns a list of all of the reports whose names begin with cust.

C:\PS>Get-AXReport -OnlyName -ReportName Cust*

CustAccountStatement_FR
CustAccountStatementExt
CustAccountStatementInt
CustAgingReport
CustAuditor
CustBalanceList
CustBalanceList_MY


Grant users access to reports [AX 2012]

Applies To: Microsoft Dynamics AX 2012 R2, Microsoft Dynamics AX 2012 Feature Pack, Microsoft Dynamics AX 2012

This topic explains how to give users access to reports. Two procedures are described in this topic. The procedure that you should use depends on whether you are running Microsoft SQL Server Reporting Services in native mode or SharePoint integrated mode.

NoteNote

SharePoint integrated mode is supported if you are using Microsoft Dynamics AX 2012 R2.

Assign users to the DynamicsAXBrowser role on the Report Manager site

If you are running Reporting Services in native mode, you must assign users or groups to the DynamicsAXBrowser role on the Report Manager site. The following procedure explains how to complete this task.

  1. Open the Report Manager website for the Reporting Services instance. By default, the URL is http://[SSRSServerName]:80/Reports.

  2. Click the DynamicsAX folder.

  3. Click Folder Settings.

  4. Click Security.

  5. Click New Role Assignment.

  6. Enter the Active Directory user name or group to assign to the DynamicsAXBrowser role.

  7. Select the DynamicsAXBrowser role.

  8. Click OK.

Grant users permission to view reports in SharePoint

If you are running Reporting Services in SharePoint integrated mode, you must grant users permission to view reports in SharePoint. To grant this permission, grant users Read permission to the document library that stores the reports. Alternatively, if the document library inherits permissions from the site, you can grant users Read permission to the site. The following procedure describes how to grant users Readpermission to the site.

ImportantImportant

If the SharePoint site is configured for claims-based authentication, you must also grant the following accounts Read permission to the document library or site:

  • The account that is used as the Business Connector proxy

  • The account that is used to run the Microsoft Dynamics AX Application Object Server (AOS) service.

  1. Open your browser and navigate to the SharePoint site that contains the document library that stores the reports.

  2. Click Site Actions > Site Permissions.

  3. Click Grant Permissions. The Grant Permissions window is displayed.

  4. In the Users/Groups field, enter the Active Directory names of the users or groups that you want to view reports.

  5. In the Grant Permissions area, select the Grant users permission directly option.

  6. Select the Read check box.

    NoteNote

    If you want users of Enterprise Portal for Microsoft Dynamics AX to be able to filter reports by using a custom parameter value, select the Design check box. For more information about the permissions that are required to use Enterprise Portal, see Enable users to access Enterprise Portal.

  7. Click OK.

Create a document library to store reports [AX 2012]

Applies To: Microsoft Dynamics AX 2012 R2

If you are using Microsoft Dynamics AX 2012 R2, and if Microsoft SQL Server Reporting Services is running in SharePoint integrated mode, create a document library in SharePoint to store your reports. Complete this procedure before you deploy the default reports that are included with Microsoft Dynamics AX.

NoteNote

This procedure does not apply to you if you are running Reporting Services in native mode.

Create a document library

Create a document library on your SharePoint site to store reports. For information about how to create a document library, see the SharePoint documentation.

After you create the document library, add Reporting Services content types to the library. For more information, see Add Report Server Content Types to a Library (Reporting Services in SharePoint Integrated Mode) in the SQL Server documentation.

Specify the URL of the document library

After you have created the document library, complete the following procedure to specify the URL of the document library in the Report servers form in Microsoft Dynamics AX.

  1. Open Microsoft Dynamics AX.

  2. Click System administration > Setup > Business intelligence > Reporting Services > Report servers.

  3. In the Configuration ID field, enter a name that identifies the Reporting Services instance and the Application Object Server (AOS) instance that you are connecting.

  4. In the Description field, enter a brief description to help you identify the Reporting Services instance and the AOS instance that you are connecting.

  5. Select the Default configuration check box to make the Reporting Services and AOS instances that are specified in this record the active connection.

  6. On the Reporting Server information tab, enter the following information:

    1. In the Server name field, enter the name of the server that is running Reporting Services.

    2. In the Server instance name field, enter the name of the Reporting Services instance.

      NoteNote

      If you are using Reporting Services 2012, enter @Sharepoint.

    3. Leave the Report Manager URL field blank. This field becomes unavailable when you select the SharePoint integrated mode check box in a later step.

    4. In the Web service URL field, enter the URL of the Reporting Services web service.

      • If you are using Reporting Services 2008, the URL is typically http://[SSRSServerName]/ReportServer.

      • If you are using Reporting Services 2012, the URL is typically http://[SharePointServerName]/_vti_bin/ReportServer or http:[SharePointServerName]/sites/[SiteName]/_vti_bin/ReportServer.

    5. Select the SharePoint integrated mode check box.

    6. In the Microsoft Dynamics AX report folder field, enter the URL of the document library that you created to store reports.

      For example, suppose that you have created a document library that is named Reports on a SharePoint site that is named Contoso. In this example, the URL is as follows:

      http://[SharePointServerName]/sites/Contoso/Reports

  7. On the Application Object Server information tab, select the name of the AOS instance.

Deploy reports for the new Reporting Services instance [AX 2012]

Applies To: Microsoft Dynamics AX 2012 R2, Microsoft Dynamics AX 2012 Feature Pack, Microsoft Dynamics AX 2012

Microsoft Dynamics AX includes many default reports that you must deploy. You can deploy these reports by using Windows PowerShell. The following procedures can help you deploy the reports.

Before you begin

Before you can deploy the reports by using Windows PowerShell, you must complete the following tasks:

  • Verify that Windows PowerShell 2.0 is installed on the computer that you are using.

  • Verify that your Windows domain account is a member of the Administrators group on the server that is running Microsoft SQL Server Reporting Services.

    NoteNote

    If your Windows domain account is assigned to a group that is a member of the Administrators group, it may take some time to validate that you are a member of the Administrators group. If you experience a delay when you deploy reports, consider adding your Windows domain account directly to the Administrators group.

  • If Reporting Services is running in native mode, verify that you are assigned to the System Administrator role on the Report Manager website.

  • If Reporting Services is running in SharePoint integrated mode, verify that you have been granted Contribute permission to the document library where you plan to deploy the reports.

    NoteNote

    SharePoint integrated mode is supported if you are using Microsoft Dynamics AX 2012 R2.

Open Windows PowerShell and view a list of reports

Complete the following procedure to open Windows PowerShell and view a list of the reports that are included with Microsoft Dynamics AX.

  1. Open Windows PowerShell as an administrator by following these steps.

    1. Click Start > Administrative Tools.

    2. Right-click the Microsoft Dynamics AX 2012 Management Shell option.

    3. Click Run as administrator.

  2. Retrieve a list of the reports that are included with Microsoft Dynamics AX, and store the list in a local variable by entering the following command:

    Windows PowerShell

    $reports = Get-AXReport -ReportName *

    For more information about the Get-AXReport command, see Get-AXReport.


  3. View the list of reports by entering the following command:

    Windows PowerShell

    $reports

Filter the list of reports


In the previous procedure, you displayed a list of all the reports that are included with Microsoft Dynamics AX. To modify and filter the list, you can use the following commands.


  • To modify the list so that only the Name and ChangedDate fields are displayed, enter the following command:

    Windows PowerShell

    $reports | Select-Object Name,ChangedDate


  • To filter the list so that only specific reports are listed, enter keywords or report names. For example, to filter the list so that only reports that contain the word CustTrans are listed, enter the following command:

    Windows PowerShell

    $reports | Select-Object Name,ChangedDate | Where { $_.Name -like "CustTrans*" }

Deploy the reports


After you have retrieved a list of reports, you can deploy the reports. The Publish-AXReport command is used to deploy the reports. The following examples show how to use this command. For more information, see Publish-AXReport.

NoteNote

In the following examples, SSRSConfigID refers to a configuration ID that was defined in Microsoft Dynamics AX. To view these configuration IDs, open Microsoft Dynamics AX and then open the Report servers form. (ClickSystem administration > Setup > Business intelligence > Reporting Services > Report servers.) To deploy reports to the new Reporting Services instance, enter the configuration ID that is associated with that instance.


  • To deploy a specific report, enter the name of the report. For example, to deploy the CustTransList report, enter the following command:

    Windows PowerShell

    Publish-AXReport –Id SSRSConfigID -ReportName CustTransList


  • To deploy two or more specific reports, enter the names of the reports. For example, to deploy the CustTransList and CustTransOpenPerDate reports, enter the following command:

    Windows PowerShell

    Publish-AXReport –Id SSRSConfigID -ReportName CustTransList, CustTransOpenPerDate


  • To deploy all reports, enter the following command:

    Windows PowerShell

    Publish-AXReport –Id SSRSConfigID –ReportName *

Extensible Data Security Framework – AX 2012

The extensible data security framework is a new feature in Microsoft Dynamics AX 2012 that enables developers and administrators to secure data in shared tables such that users have access to only the part of the table that is allowed by the enforced policy. This feature can be used in conjunction with role-based security (also supported in Microsoft Dynamics AX 2012) to provide more comprehensive security than was possible in the past.

Extensible data security is an evolution of the record-level security (RLS) that was available in earlier versions of Microsoft Dynamics AX.

Extensible data security policies, when deployed, are enforced, regardless of whether data is being accessed through the Microsoft Dynamics AX rich client forms, Enterprise Portal web pages, SQL Server Reporting Services (SSRS) reports, or .NET Services.
The extensible data security framework provides the following benefits to the system administrator who helps secure data in Microsoft Dynamics AX 2012:

Improved filters for data security
In previous releases, the record-level security feature was used to help secure the data. The filters that were used for record-level security could not be based on fields that were contained in a separate table from the data that was being filtered. For example, to filter sales lines, you could not use the customer location, because the customer location field is not contained in the sales line table. In addition, record-level security was enforced only through the client interface.

In Microsoft Dynamics AX 2012, the extensible data security framework can be used to help secure the data. By using the new framework, you can create data security policies that are based on data that is contained in a different table. Data security policies are enforced at the server, regardless of the type of client that is used to access the data. In addition, policies can take security privileges into account. For example, the administrator can grant View access to one subset of
sales orders and Edit access to another subset of sales orders.

CAUTION: The record-level security feature is still available in Microsoft Dynamics AX 2012, but it will become obsolete in a future release. Filters that you previously set up for record-level security can still be used. If you set up new filters, we recommend that you create data security policies by using the extensible data security framework.

Data security that is based on effective dates
In Microsoft Dynamics AX 2012, you can specify whether the users in a role have access to past, present, or future records. A user can also have different levels of access based on effective dates.

For example, a user can have access to view past records, and access to create and edit present records.

How to create an item using ItemServices and EcoResProductServices in AX 2012

using System;

using System.Collections.Generic;

using System.Linq;

using System.Net;

using System.ServiceModel.Description;

using System.Text;

using Tutorial.AIF.CreateItem.EcoResProductServices;

using Tutorial.AIF.CreateItem.InventItemServices;


namespace Tutorial.AIF.CreateItem

{

class Program

{

static void Main(string[] args)

{

try

{

ItemServiceCreateRequest request = new ItemServiceCreateRequest();

ItemServiceClient client = new ItemServiceClient();


EcoResProductServiceCreateRequest prodRequest = new EcoResProductServiceCreateRequest();

EcoResProductServiceClient prodClient = new EcoResProductServiceClient();


ReqItemTableServiceCreateRequest reqItemRequest = new ReqItemTableServiceCreateRequest();

ReqItemTableServiceClient reqItemClient = new ReqItemTableServiceClient();


reqItemRequest.CallContext = new InventItemServices.CallContext();

reqItemRequest.CallContext.Company = "CAD";

reqItemRequest.CallContext.Language = "en-us";

reqItemRequest.CallContext.MessageId = Guid.NewGuid().ToString();


prodRequest.CallContext = new EcoResProductServices.CallContext();

prodRequest.CallContext.Language = "en-us";

prodRequest.CallContext.Company = "CAD";

prodRequest.CallContext.MessageId = Guid.NewGuid().ToString();

request.CallContext = new Tutorial.AIF.CreateItem.InventItemServices.CallContext();

request.CallContext.Language = "en-us";

request.CallContext.Company = "CAD";

request.CallContext.MessageId = Guid.NewGuid().ToString();


AxdEntity_Product_EcoResProduct[] ecoResProduct = new AxdEntity_Product_EcoResProduct[1];

ecoResProduct[0] = new AxdEntity_Product_EcoResDistinctProduct();

ecoResProduct[0].ProductType = AxdEnum_EcoResProductType.Item;

ecoResProduct[0].SearchName = "68727900121";

ecoResProduct[0].DisplayProductNumber = "ITEM002";


AxdEntity_Translation prodTranslation = new AxdEntity_Translation();

prodTranslation.Name = "ITEM002";

prodTranslation.LanguageId = "en-us";


ecoResProduct[0].Translation = new[] { prodTranslation };


AxdEntity_Identifier identifier = new AxdEntity_Identifier();

identifier.ProductNumber = "68727900121";


ecoResProduct[0].Identifier = new AxdEntity_Identifier[1];

ecoResProduct[0].Identifier[0] = identifier;


AxdEcoResProduct product = new AxdEcoResProduct();

product.Product = ecoResProduct;


prodClient.Open();

Tutorial.AIF.CreateItem.EcoResProductServices.EntityKey[] keys = prodClient.create(prodRequest.CallContext, product);

prodClient.Close();


AxdEntity_InventTable[] inventTable = new AxdEntity_InventTable[1];

inventTable[0] = new AxdEntity_InventTable();

inventTable[0].ItemId = "ITEM002";

inventTable[0].NameAlias = "ITEMNAMEALIAS";

inventTable[0].Product = "ITEM002";

//inventTable[0].Product = keys[0].KeyData[0].Value.Trim();


inventTable[0].StorageDimensionGroup = new[] { new AxdEntity_StorageDimensionGroup { StorageDimensionGroup = "DEF", ItemId = inventTable[0].ItemId } };

inventTable[0].TrackingDimensionGroup = new[] { new AxdEntity_TrackingDimensionGroup { TrackingDimensionGroup = "DEF", ItemId = inventTable[0].ItemId } };

inventTable[0].InventModelGroupItem = new[] { new AxdEntity_InventModelGroupItem { ModelGroupId = "DEF", ItemId = inventTable[0].ItemId } };

inventTable[0].InventItemGroupItem = new[] { new AxdEntity_InventItemGroupItem { ItemGroupId = "ALL", ItemId = inventTable[0].ItemId } };


//if you want to insert reqItemTable (item coverage settings) you need to create a service for that

//INVENTDIMID

inventTable[0].InventItemPurchSetup = new[] {

new AxdEntity_InventItemPurchSetup {

//HERE WE WILL ADD ORDER SPECIFIC SETTINGS FOR THIS PARTICULAR ITEM

ItemId = inventTable[0].ItemId,

InventDimPurchSetup = new AxdEntity_InventDimPurchSetup[] {

new AxdEntity_InventDimPurchSetup() {

InventDimId = "AllBlank"

}

},

DefaultInventDimPurchSetup = new [] {

new AxdEntity_DefaultInventDimPurchSetup() {

InventDimId = "AllBlank",

InventSiteId = "MTL-01"

}

}

},

//HERE WE WILL ADD SITE SPECIFIC SETTINGS FOR THIS PARTICULAR ITEM

new AxdEntity_InventItemPurchSetup {

ItemId = inventTable[0].ItemId,

InventDimPurchSetup = new AxdEntity_InventDimPurchSetup[] {

new AxdEntity_InventDimPurchSetup() {

InventSiteId = "MTL-01"

}

},

DefaultInventDimPurchSetup = new [] {

new AxdEntity_DefaultInventDimPurchSetup() {

InventLocationId = "01"

}

}

},

};


inventTable[0].InventItemSalesSetup = new[] {

new AxdEntity_InventItemSalesSetup {

ItemId = inventTable[0].ItemId,

InventDimSalesSetup = new AxdEntity_InventDimSalesSetup[] {

new AxdEntity_InventDimSalesSetup() {

InventDimId = "AllBlank"

}

},

DefaultInventDimSalesSetup = new [] {

new AxdEntity_DefaultInventDimSalesSetup() {

InventDimId = "AllBlank",

InventSiteId = "MTL-01"

}

}


},

new AxdEntity_InventItemSalesSetup {

ItemId = inventTable[0].ItemId,

InventDimSalesSetup = new AxdEntity_InventDimSalesSetup[] {

new AxdEntity_InventDimSalesSetup() {

InventSiteId = "MTL-01"

}

},

DefaultInventDimSalesSetup = new [] {

new AxdEntity_DefaultInventDimSalesSetup() {

InventLocationId = "01"

}

}


}

};


inventTable[0].InventItemInventSetup = new[] {

new AxdEntity_InventItemInventSetup {

ItemId = inventTable[0].ItemId,

InventDimInventSetup = new AxdEntity_InventDimInventSetup[] {

new AxdEntity_InventDimInventSetup() {

InventDimId = "AllBlank"

}

},

DefaultInventDimInventSetup = new [] {

new AxdEntity_DefaultInventDimInventSetup() {

InventDimId = "AllBlank",

InventSiteId = "MTL-01"

}

}


},

new AxdEntity_InventItemInventSetup {

ItemId = inventTable[0].ItemId,

InventDimInventSetup = new AxdEntity_InventDimInventSetup[] {

new AxdEntity_InventDimInventSetup() {

InventSiteId = "MTL-01"

}

},

DefaultInventDimInventSetup = new [] {

new AxdEntity_DefaultInventDimInventSetup() {

InventLocationId = "01"

}

}


}

};


AxdItem items = new AxdItem();

items.InventTable = inventTable;


client.Open();

client.create(request.CallContext, items);

client.Close();

}

catch (Exception e)

{

Console.WriteLine(e.Message);

Console.Read();

}


}

}

}


Imparted from here

Security Roles - Ax 2012

All users must be assigned to at least one security role in order to have access to Microsoft Dynamics AX. The security roles that are assigned to a user determine the duties that the user can perform and the parts of the user interface that the user can view.

Administrators can apply data security policies to limit the data that the users in a role have access to. For example, a user in a role may have access to data only from a single organization. The administrator can also specify the level of access that the users in a role have to current, past, and future records. For example, users in a role can be assigned privileges that allow them to view records for all periods, but that allow them to modify records only for the current period.

By managing access through security roles, administrators save time because they do not have to manage access separately for each user. Security roles are defined one time for all organizations. In addition, users can be automatically assigned to roles based on business data. For example, the administrator can set up a rule that associates a Human resources position with a security role. Any time that users are assigned to that position, those users are automatically added to the appropriate security roles. Users can also be automatically added to or removed from roles based on the Active Directory groups that they belong to.

Security roles can be organized into a hierarchy. A role hierarchy enables roles to be defined as combinations of other roles. For example, the sales manager role can be defined as a combination of the manager role and the salesperson role.

In the security model for Microsoft Dynamics AX, duties and privileges are used to grant access to the program. For example, the sales manager role can be assigned the Maintain revenue policies and Review sales orders duties.
By default, sample security roles are provided. All functionality in Microsoft Dynamics AX is associated with at least one of the sample security roles. The administrator can assign users to the sample security roles, modify the sample security roles to fit the needs of the business, or create new security roles. By default, the sample roles are not arranged in a hierarchy.

NOTE: The sample security roles do not correspond to Role Centers.

Security Roles

All users must be assigned to at least one security role in order to have access to Microsoft Dynamics AX. The security roles that are assigned to a user determine the duties that the user can perform and the parts of the user interface that the user can view.

Administrators can apply data security policies to limit the data that the users in a role have access to. For example, a user in a role may have access to data only from a single organization. The administrator can also specify the level of access that the users in a role have to current, past, and future records. For example, users in a role can be assigned privileges that allow them to view records for all periods, but that allow them to modify records only for the current period.

By managing access through security roles, administrators save time because they do not have to manage access separately for each user. Security roles are defined one time for all organizations. In addition, users can be automatically assigned to roles based on business data. For example, the administrator can set up a rule that associates a Human resources position with a security role. Any time that users are assigned to that position, those users are automatically added to the appropriate security roles. Users can also be automatically added to or removed from roles based on the Active Directory groups that they belong to.

Security roles can be organized into a hierarchy. A role hierarchy enables roles to be defined as combinations of other roles. For example, the sales manager role can be defined as a combination of the manager role and the salesperson role.

In the security model for Microsoft Dynamics AX, duties and privileges are used to grant access to the program. For example, the sales manager role can be assigned the Maintain revenue policies and Review sales orders duties.
By default, sample security roles are provided. All functionality in Microsoft Dynamics AX is associated with at least one of the sample security roles. The administrator can assign users to the sample security roles, modify the sample security roles to fit the needs of the business, or create new security roles. By default, the sample roles are not arranged in a hierarchy.

NOTE: The sample security roles do not correspond to Role Centers.

Security architecture of the Microsoft Dynamics AX application [AX 2012]

When you understand the security architecture of Microsoft Dynamics AX, you can more easily customize security to fit the needs of your business. The following diagram provides a high-level overview of the security architecture of Microsoft Dynamics AX.

security architecture diagram

Authentication

By default, only authenticated users who have user rights in Microsoft Dynamics AX can establish a connection.

The Microsoft Dynamics AX client uses integrated Windows authentication to authenticate Active Directory users.

Enterprise Portal supports flexible authentication, which allows you to use authentication providers other than Active Directory. If you configure Enterprise Portal to use a different authentication provider, users are authenticated by that provider.

After a user connects to the client or Enterprise Portal, access is determined by the duties and privileges that are assigned to the security roles that the user belongs to.

Authorization

Authorization is the control of access to the Microsoft Dynamics AX application. Security permissions are used to control access to individual elements of the application: menus, menu items, action and command buttons, reports, service operations, web URL menu items, web controls, and fields in the Microsoft Dynamics AX client and Enterprise Portal for Microsoft Dynamics AX.

In Microsoft Dynamics AX, individual security permissions are combined into privileges, and privileges are combined into duties. The administrator grants security roles access to the application by assigning duties and privileges to the roles.

For more information about role-based security in Microsoft Dynamics AX, see Role-based security in Microsoft Dynamics AX.

Data security

Authorization is used to grant access to elements of the application. By contrast, data security is used to deny access to tables, fields, and rows in the database.

Use the extensible data security framework to control access to transactional data by assigning data security policies to security roles. Data security policies can restrict access to data, based on the effective date or based on user data, such as the sales territory or organization. For more information about how to use data security policies in Microsoft Dynamics AX, see Overview of Security Policies for Table Records.

In addition to the extensible data security framework, record-level security can be used to limit access to data that is based on a query. However, because the record-level security feature is becoming obsolete in a future release of Microsoft Dynamics AX, we recommend that you use data security policies, instead.

Additionally, the Table Permissions Framework helps protect some data. Data security for specific tables is enforced by Application Object Server (AOS). For more information about the Table Permissions Framework, seeManage data access by using the Table Permissions Framework.

Install Microsoft Dynamics AX in Silent Mode

When you run the Setup wizard, Setup is running in interactive mode. This means a graphical user interface (GUI) prompts you for required information.
Alternatively, you can run Setup in silent mode, with no GUI displaying. In this mode, required information is supplied at the command prompt or in a parameter file. You can install any Microsoft Dynamics AX component in silent mode.
NOTE: A silent installation is especially useful when deploying multiple clients at one time.

Deploy Multiple Clients
To deploy multiple Microsoft Dynamics AX Windows clients at one time, it is recommended that you use the following process.
1. Copy the contents of the Microsoft Dynamics AX DVD to a shared directory on the network.
2. Create a common configuration file in a shared directory on the AOS computer that clients will connect to.
3. Create a batch file to install clients with a shared configuration. The file must be located in a shared directory in  the Microsoft Dynamics AX DVD shared folder, at the same level as Setup.exe.
4. Test the batch file on a local computer.
5. Use a mass deployment tool such as Group Policy or Microsoft Systems Management Server to run the batch file from a logon script.

For more information about using Group Policy to deploy software, refer to: http://go.microsoft.com/fwlink/?LinkId=92736.
For more information about using Systems Management Server to deploy software, refer to: http://go.microsoft.com/fwlink/?LinkId=115327.
The following procedures contain more detailed information about creating a shared configuration file and creating a command file.


Determine Which Parameters to Use
The same parameters are available whether you enter them at the command prompt or create a parameter file. For information about individual parameters, refer to the Setup parameters reference (http://go.microsoft.com/fwlink/?LinkId=191476) on TechNet.
To determine which parameters to use, it is recommended that you install a client on a single computer and then review the Setup log file, which is located at <Drive>\Program Files\Microsoft Dynamics AX\Dynamics AX\60\Setup
logs\Date Time\DynamicsSetupLog.txt. The log lists the parameters used in the installation.

Specify Installation Parameters at the Command Prompt
Use the following procedure to run the installation by entering parameters at the command prompt.
1. Open a Command Prompt window.
2. At the command prompt, type the following information: <Path to DVD or shared directory>\Setup.exe parameter1="value" parameter2="value". When using multiple parameters, insert a single space between parameters.
WARNING: If you enter duplicate parameters, Setup will fail silently.
3. After you have listed all parameters, press Enter.

Specify Installation Parameters Using a Parameter File
Use the following procedure to run the installation by specifying a parameter file at the command prompt.
1. Create a text file that lists the appropriate installation parameters and their values. In the parameter file, the Name=Value combination for each parameter must be on a separate line.
WARNING: If you enter duplicate parameters, Setup will fail silently.
2. Do not include double quotation marks in parameter files. Because a line return is used as a delimiter in a parameter file, values that otherwise require the use of double quotation marks do not require them here. To prevent a line in a parameter file from being read, type a number sign (#) before the line. The line will be treated as a
comment rather than a command or parameter.
3. Open a Command Prompt window.

4. At the command prompt, type the following information: <Path to DVD or shared directory>\Setup.exe ParmFile=<path to file\FileName.txt>. The path can be fully qualified or relative to the location of the Setup.exe file. Relative paths can include upward qualifiers such as "..\..\".
5. Press Enter.

NOTE: To set up clients to use a shared configuration file, set the ClientConfigFile path parameter to the file in the shared directory. ClientConfigFile="X:\<name of configuration file>.axc"

Sample Parameter File
The following is an example of a parameter file that can be used to install the databases and the Application Object Server (AOS). Your parameter file will vary, based on the components that you are installing.
HideUI=1
AcceptLicenseTerms=1
DbSqlServer=SQLServerName
DbSqlDatabaseName=DatabaseName
InstallApplication=1
ApplicationInstanceName=ApplicationInstanceName
InstallAos=1
AosInstanceName=AOSInstanceName
AosApplicationPath="C:\Program Files\Microsoft Dynamics AX\60"
AosReportErrors=0

Procedure: Create a Group Policy Logon Script
To install clients using Group Policy, follow these steps:
1. Open Start > Administrative Tools > Group Policy Management.
2. Expand Group Policy: Management > Forest: Contoso.com > Domains > Contoso.com.
3. Right click Contoso.com, and select Create a GPO in this domain, and Link it here.

image

4. In the Name field, type "Dynamics AX Logon Script", then click OK.
5. Right-click "Dynamics AX Logon Script", then click Edit.
6. Expand User Configuration > Policies > Windows Settings > Scripts (Logon/Logoff).
7. In the right pane right click Logon, and then click Properties.
8. Click Show Files. This will bring up a file dialog in a logon folder.
9. Right-click the folder and then click New > Text Document to create a new text document in this directory.
10. Double-click the new file to open it in Notepad.
11. Enter the following script and save the file: D:\Setup.exe HideUI=1 AcceptLicenseTerms=1 InstallClientUI=1
ClientAosServer=Company1 ClientLanguage=en-US ClientHelpLanguages=en-US

NOTE: The directory path for Setup.exe should be a network path.

12. Right-click and rename "New Text Document.txt" to "AxInstallClient.cmd", then confirm the change of the file name extension when you are prompted.
13. Close the Windows Explorer menu.
14. Click Add, then click Browse.
15. Select "AxInstallClient.cmd", and then click Open.
16. Click OK.
17. Notice that the script has been added to logon properties, and then click OK.
18. Close Group Policy Management Editor.

NOTE: This setup can be proven by uninstalling the client, look to verify that the client has been removed, logoff the Virtual Machine (VM), logon to the VM, and verify that the client has been reinstalled. It might take several minutes after the logging on for the Microsoft Dynamics AX 2012 to apply.

NOTE: Scripts can also be set to run on the startup and shutdown of a server.

How to: Override the fetch Method to Filter Data for Reports (MorphX Reporting Tools)–AX 2009

You can override the fetch method to filter the data that is displayed in a report. This override does not reduce the number of records that are returned by the query of the report. Instead it prevents some records from being sent to the final report. Each record is examined by the branching logic you add to the fetch method. Branching determines which records to give to the send method. Those records appear in the final report.

Note

Do not call super() when you override the fetch method in a report.

By default, each record that is returned by the query appears in the report. To reduce the number of records returned, add range restrictions to the query. Report ranges are more efficient than overriding the fetchmethod; however, report ranges are less expressive. For information about adding ranges to queries, see Query Elements in the AOT.

Example


The following code example loops through each record that is returned by the query. The code tests a field in each record and branches to a send method call for records that belong in the report.

In this example, the BankAccountTable table is the only data source for the report. The fetch method in the report is overridden with the following code.

public boolean fetch()
{
boolean retCode = false;
BankAccountTable bankAccountTableRec;
QueryRun qrun;
;
// Use the queryRun object that is associated with the
// report; element refers to the report.
qrun = new QueryRun(element);

// Verify that the report dialog works.
if (! qrun.prompt())
{
return retCode;
}

// Loop through each record from the data source query of the report.
while (qrun.next())
{
// Get the BankAccountTable fields from the query record.
bankAccountTableRec = qrun.get(TableNum(BankAccountTable));

// Exclude ODDBANK from the visible report.
if (bankAccountTableRec.AccountID != "ODDBANK")
{
// Include the current record in the report.
element.send(bankAccountTableRec);
}
}
retCode = true;

// retCode = super(); // Do not call super() when you override the fetch method.
return retCode;
}

Include cumulative updates and hotfixes in a new installation (slipstreaming) AX 2012

Applies To: Microsoft Dynamics AX 2012 R2, Microsoft Dynamics AX 2012 Feature Pack, Microsoft Dynamics AX 2012

If you are installing Microsoft Dynamics AX components for the first time, and cumulative updates, binary hotfixes, or service packs for Microsoft Dynamics AX are available, you can incorporate the updates into the installation by using a process that is known as slipstreaming.

When updates are slipstreamed, Setup automatically detects and applies them. In this way, the time that is required to install the whole Microsoft Dynamics AX solution is reduced.

clip_image001_thumbNote

Components that were previously installed are not updated during a later slipstream installation. For example, an instance of Application Object Server (AOS) is installed on a server. Later, you add updates to the installation source, and you also install another Microsoft Dynamics AX component on the same server. In this scenario, the existing AOS instance is not updated.

You can slipstream the following kinds of updates:

  • Cumulative updates
  • Binary hotfixes
  • Help content updates
  • Service packs

Application (database) hotfixes cannot be included in the slipstreaming process. They must be installed by using AxUpdate.exe.

The Updates folder

Before you install Microsoft Dynamics AX, you copy the DVD to a network location. This lets you modify the installation media to create a slipstream installation. Incorporate updates into the installation process by copying files to the Updates folder in the shared network location.

clip_image001[1]_thumbNote

For more information about how to install Microsoft Dynamics AX from a shared network folder, see Create a shared directory for installation.

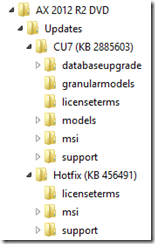
In the Updates folder, create a subfolder for each update package that you download. We recommend that you use the Knowledge Base article numbers of the updates as the names of the subfolders. For example, for the update that is associated with Knowledge Base article number 123456, create a subfolder that is named KB123456.

Extract each update into the appropriate subfolder. The following illustration shows an example of the recommended folder structure:

clip_image002_thumb

Any time that you apply a cumulative update package or a binary hotfix to your environment, we strongly recommend that you add the installation package to the Updates folder. This practice ensures that you can deploy new servers, clients, and other components of the correct version quickly. You should also make a copy of the updated installation media per your system recovery strategy.

The slipstreaming process

The following is a high-level overview of the slipstreaming process:

  1. To find cumulative updates, visit the hotfix pages for Microsoft Dynamics AX 2012 or Microsoft Dynamics AX 2012 R2 on the CustomerSource web site. Logon is required.
  2. Create a shared network location from which to install Microsoft Dynamics AX.
  3. In the Updates folder, create a subfolder for each update package that you download. Then extract each update into the appropriate subfolder.
  4. Run Setup and select the components that you want to install. Setup detects and installs the updates.

Follow the usual installation procedures to install Microsoft Dynamics AX components. For detailed installation instructions for each Microsoft Dynamics AX 2012 component, see Install Microsoft Dynamics AX.

To install updates for Help content, you must select the Help Server component, and then select the updated content sets on the Language and content selection page.

System architecture [AX 2012]

Applies To: Microsoft Dynamics AX 2012 R2, Microsoft Dynamics AX 2012 Feature Pack, Microsoft Dynamics AX 2012

If you understand the internal architecture of Microsoft Dynamics AX, you can more effectively make decisions when you plan, customize, and deploy a system. This topic provides a high-level overview of the system architecture of Microsoft Dynamics AX.

Microsoft Dynamics AX system architecture

The following diagram provides a high-level overview of the system architecture of Microsoft Dynamics AX. This diagram does not depict the system topology or physical infrastructure that are required for the deployment. Your infrastructure can consist of many Microsoft Dynamics AX components, and these components can be installed on either a single physical server or multiple physical servers. For factors that you must consider when you plan a deployment infrastructure, see Plan system topology. For detailed information about Microsoft Dynamics AX components, see Component architecture. For the current hardware and software requirements for Microsoft Dynamics AX, see the system requirements document that is available from the Microsoft Download Center.

System architecture

Authentication and authorization

Microsoft Dynamics AX uses integrated Windows authentication to authenticate Active Directory Domain Services users. If you configure Microsoft Dynamics AX to use a different authentication provider, users are authenticated by that provider. Authorization for access to data, business functionality, and presentation elements, such as forms, menus, fields, and reports, is governed by Microsoft Dynamics AX security. Anonymous web users can access Enterprise Portal for Microsoft Dynamics AX. However, only limited functionality is available to these users.

For more information, see Security architecture.

Presentation tier (clients and external applications)

A client provides an interface to Microsoft Dynamics AX data and functionality. An external application is integrated with Microsoft Dynamics AX to programmatically integrate functionality or exchange data.

  • The Windows client for Microsoft Dynamics AX is a native 32-bit program that provides a rich user interface.

  • Supported web browsers provide access to Microsoft Dynamics AX functionality and data through Enterprise Portal.

  • External applications interact with Microsoft Dynamics AX via services and Application Integration Framework (AIF). Services and AIF provide an extensible framework for XML-based scenarios for enterprise application integration (EAI), business-to-business (B2B), and service-oriented architecture (SOA).

NoteNote

Use services and AIF to interact with the Microsoft Dynamics AX application. We recommend that you not use .NET Business Connector for integration with the Microsoft Dynamics AX application.

For more information about the architecture of the presentation tier, see the following topics:

Application tier

The application tier consists of one or more of the following Microsoft Dynamics AX components or computer roles.

Active Directory domain controller

A domain controller for AD DS is a prerequisite for installing Microsoft Dynamics AX.

For more information, see Security architecture.

Application Object Server

Application Object Server (AOS) controls communication among Microsoft Dynamics AX clients, databases, and applications. AOS also hosts Microsoft Dynamics AX services and the workflow system. You can deploy AOS on a single computer or create a load-balanced cluster of multiple AOS instances. AOS is a Windows service that requires a Windows Server operating system. For the current hardware and software requirements for Microsoft Dynamics AX, see the system requirements document that is available from the Microsoft Download Center.

AOS uses libraries from the Microsoft .NET Framework version 4, such as Windows Communication Foundation and Windows Workflow Foundation.

For more information, see AOS architecture.

Enterprise Portal

Microsoft Dynamics AX provides a set of websites that give you access to data. On these sites, you can also participate in business processes by using web-based forms. These sites are collectively called Enterprise Portal.

For more information, see Enterprise Portal architecture.

Reporting

Microsoft SQL Server Reporting Services is the primary reporting platform for Microsoft Dynamics AX.

For more information, see Reporting architecture.

Analytics

Microsoft SQL Server Analysis Services is a server-based solution that provides functionality for online analytical processing (OLAP). OLAP reports help users analyze business data and identify trends that they might not discover if they view the data in traditional reports.

For more information, see Analytics architecture.

Workflow

Workflow is a system that is installed together with Microsoft Dynamics AX, and that runs on AOS. The workflow system provides functionality that you can use to create individual workflows, or business processes.

For more information, see Workflow system architecture.

Services and Application Integration Framework (AIF)

The capability to integrate Microsoft Dynamics AX with other systems inside and outside the enterprise is a common requirement. Services and AIF provide this capability by enabling the exchange of data through formatted XML.

For more information, see Services and AIF architecture.

Help server

The Help system uses a client/server architecture. Help content is hosted on a dedicated server component, the Help server, which manages the storage and display of product documentation. The Help viewer, which is a component of the Microsoft Dynamics AX client, provides access to Help content from individual workstations.

For more information, see Help system architecture.

Microsoft Project Server integration

The integration of Microsoft Dynamics AX with Microsoft Project Server requires two integration components, the synchronization service for Project Server and synchronization proxy for Project Server. To use the Project Server functionality, you must install both components.

For more information, see Project Server integration architecture.

Data tier

Microsoft Dynamics AX requires several database components.

The Microsoft Dynamics AX database

The database is a Microsoft SQL Server database that stores transaction and reference data. This database is functionally equivalent to the principal database in Microsoft Dynamics AX 4.0 and Microsoft Dynamics AX 2009.

For more information, see Database components.

The model store

The model store is a SQL Server database that stores all application elements for Microsoft Dynamics AX. These elements include customizations. Information about layers and models is an integral part of the store. AOS has access to the model store, handles layer flattening, and provides model data to all the Microsoft Dynamics AX subsystems. These subsystems include the subsystems for form rendering, report rendering, and X++ code. The model store replaces the Microsoft Dynamics AX Object Data (AOD) files that were used in earlier versions of Microsoft Dynamics AX.

For more information, see Model store architecture.

Other databases

Enterprise Portal requires content and configuration databases for SharePoint 2010 products. Reporting Services requires a Reporting Services database. Support for OLAP cubes requires a Analysis Services database.