Leader Board

Dynamics AX – Periodic maintenance and performance analysis

Imparted from here
Periodic clean up – Significance

A recent AX_Database analysis showed that the 5 largest tables in the database account for roughly 60% of the database size. The 4 largest tables out of 5 are tables with temporary and/or archival data: Inventory settlements (INVENTSETTLEMENT), database log (SYSDATABASELOG), temporary sales orders data (SALESPARMLINE), temporary master planning data (INVENTSUMLOGTTS). The fifth table is sales lines (SALESLINE). Periodically archiving/purging these tables would significantly reduce database size and will have beneficial effect on system performance.

Each individual table and related considerations are discussed below:

1.1 Inventory settlements.

The inventory settlements table is used to store information generated during inventory close and adjust periodic job run. This table can be cleaned up/compressed using the

Inventory management>Periodic>Clean up>Inventory settlements clean up.

Deleting cancelled settlement is a recommended procedure (when an inventory settlement/adjustment is cancelled the system does not remove the original adjustment but generates a set of reverse adjustments). The  clean up procedure will remove both the original set of adjustments and the reversing set.

Please note that Grouping (compressing) settlements should be used with care as compression cannot be reversed and settlements for compressed periods cannot be reversed as well. That means that it is better to use this function only for previous financial years (i.e. group settlements posted before date should typically current date – 1 year).

The Inventory settlements clean up  can be batch-scheduled, takes a few hours to run and is best to be scheduled overnight or on the weekend.

The suggested schedule is once per quarter.

The batch job can be setup to run this procedure over night but the dates will have to be changed before every batch is run. E.g. the batch can be setup to run at 12:00 am to purge transactions of a year ago.

Note: The purge date will have to be changed manually before every batch job as AX will not calculate a rolling date of when transactions need to be purged

Note: Please see the document on Batch job procedures for information in setting up a batch job.

1.2 Database log

The database log table is used to store logging information generated according to the log rules set up in Administration>Setup>Database log.

There are 2 main points to consider for database log maintenance.

The first one is that there should not be excessive logging. The database log setup should be reviewed and some of the rules (such as logging of all changes on sales lines) were removed. When new rules are added it is important to analyse the entries generated in the log to see that no excessive logging is performed.

The second consideration  is that the database log should be cleaned up periodically. The log can be backed up to a binary or .csv file if required using AX data  export-import utility and the clean up routine is accessible via Administration>Inquiries>Database log>Clean up log(button).

Keeping one month of logs in the system is probably sufficient especially if they are backed up to the file system.

Please note that running clean up for the first time will take significant time and affect system performance because of the amount of log data accumulated. The task can be batch-scheduled.

The suggested schedule is once per month.

Back up database log:

Create a definition group for database log Administration/Periodic/Data export/Import/Definition group

  • CTRL N to create a new definition group.
  • Specify a meaningful name and select type Excel to create an Excel file to back up.
  • Click OK

  • Click on the Table setup button

  • Select all the tables and click Delete

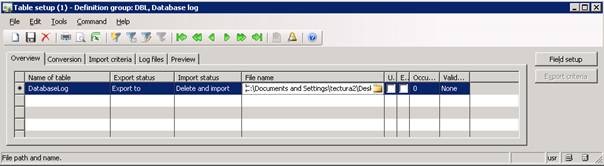
  • Enter ‘DatabaseLog’ in the table name, Export status = Export to, Specify the file name where the back up must be saved.
  • Close form
  • To Export file click on the Export to button, click OK button if file should be saved to the path specified in the definition group (Previous example) or click on ‘Override file names specified in definition group’ and specify a different file name.

1.3 Temporary sales order/purchase order processing data

Temporary sales order

This table stores temporary sales order line entries when a sales order is posted. The temporary lines are not deleted after posting and need to be cleaned up periodically. The clean up job can be accessed via

Accounts receivable > Periodic > Clean up > Sales update history clean up.

Delete both executed and erroneous data. There is no reason to keep more than a month’s data. Please note that running for the first time will take significant time and affect system performance because of the amount of log data accumulated. The task can be batch-scheduled.

The suggested schedule is once per month.

Note: there is a similar job in the AP module,

1.4 Temporary master planning data.

Table : InventSumLogtts

This table stores inventory movements data used by dynamic master planning. The table is supposed to be automatically purged when a dynamic master plan is run. If there are test companies in the production environment then it would add up data in this table.

Also there is no periodic job to clean up this table, so typically if a company does not use master planning data must be deleted from the table manually (e.g. using SQL server).

It might be beneficial to check this table immediately after master planning session is run to see if it purges correctly.

1.5 Sales line

This table stores sales lines. There is a periodic job in the system that can either delete or void (move to another table) closed (invoiced or cancelled) sales order lines.  The job is accessible via AR>Periodic> Delete orders.

Depending on the “Mark orders as voided” check box in AR Parameters the sales orders selected in the Delete orders periodic job will either be completely deleted from the system or moved to the voided orders table.

2 Non-production companies in the Production system

Check if the client uses test companies (e.g. TST) in production environment which for example account for around 40% of all data in the inventory settlement table.

It is not recommended to keep test companies in the production environment. If a copy of live data is required it is recommended to restore a live database backup into a separate test environment. The recommendation is to delete non-production companies from the production environment, which would lead to significant reduction in table sizes and index sizes.

If there is a requirement to copy a single company only without using the database backup standard dynamics AX import-export utility can be used to achieve this, but the SQL database back up is a faster method.

3 Periodic indexing

Table indexes should be rebuilt periodically to ensure optimum data query performance. Re-indexing should be done periodically and is accessible via Administration>Periodic>SQL administration

Recommended schedule is weekly. Indexing must also be done after any significant update to master file data, e.g. reassigning customers to a new dimension etc.

Add a new disk to a SQL Server 2008 R2 Failover Cluster (running on Windows Server 2008 R2)

Imparted from

Follow up the following steps:

1. Configure your SAN to present your disks to the Cluster Servers.

2. Detect the new disk’s at Windows Storage Manager (on both servers):

image

3. Add this new this to the cluster Service (Go to Server Manager –> Features –> Failover Cluster Manager –> Storage –> Right Click and click Add a Disk):

image

4. Go to Failover Cluster Manager –> Services and Applications, and right click SQL Server and then select “Add storage”:

image

5. Now it’s important, after the step 4 you can see the disk at cluster service associated to the SQL Server Service, but at SQL Server Manager, you can’t see the disk! So, you just need to add service dependence:

Right Click SQL Server Resource, and click Properties:

image

Click on Dependencies Tab, and then click on the last line to add a new line, and select “AND” and then select the new disk resource:

image

image

Now click Apply and OK and the new disk is now available to the SQL Server Service!

image

How to: Open a Development Workspace [AX 2012]

Imparted from Here


In Microsoft Dynamics AX 2012, by default, the client opens in an Application Workspace. As a developer, you may prefer to open the Microsoft Dynamics AX client directly into a Development Workspace.

NoteNote

To open a Development Workspace, a developer license key is required, and the installation checklist must be completed. No more than eight workspaces per client can be opened at the same time.

This topic describes:

  • How to open a Development Workspace from the Application Workspace.

  • Three methods to directly start the client in a Development Workspace.

  • A code example to open a Development Workspace using X++.

To open a Development Workspace from the Application Workspace
  • Click Windows > New Development Workspace. A Development Workspace opens in a new window.

    TipTip

    You can also press CTRL+Shift+W to open a Development Workspace.

To open a Development Workspace by configuration
  1. Click Start > All Programs > Administrative Tools > Microsoft Dynamics AX 2012 Configuration. The Microsoft Dynamics AX Configuration Utility window opens.

  2. On the General tab, click Manage, and then click Create configuration.

  3. On the Create Configuration form, enter a name for the configuration in the Configuration name field, and then click OK. The Create Configuration form closes and you return to the Microsoft Dynamics AX Configuration Utility window.

  4. On the General tab, in the Command to run at application startup field, enter -development, and then click OK to save the new configuration. The settings will apply the next time you open the Microsoft Dynamics AX client.

To open a Development Workspace using the command line
  1. On the taskbar, click Start, and then click Run.

  2. In the Open field, enter cmd, and then click OK.

  3. At the command prompt, type the following: "C:\Program Files\Microsoft Dynamics AX\60\Client\Bin\Ax32.exe" -development

To create a shortcut to open a Development Workspace
  1. In Windows Explorer, right-click the Ax32.exe file in your Microsoft Dynamics AX 2012 client installation, and then click Create Shortcut. By default, this file is located in the C:\Program Files\Microsoft Dynamics AX\60\Client\Bin directory. A new shortcut named Shortcut to Ax32.exe is created.

  2. Right-click Shortcut to Ax32.exe, and then click Properties. The Shortcut to Ax32.exe Properties window opens.

  3. On the Shortcut tab, in the Target field, enter -development after the path to the Ax32.exe file. The Target field should resemble "C:\Program Files\Microsoft Dynamics AX\60\Client\Bin\Ax32.exe" -development.

  4. Click OK to save the shortcut. You can move and rename the shortcut as needed.

Example


You can also open a Development Workspace directly from X++ code. For example, you can add a customized button in the Application Workspace to open a Development Workspace. The following X++ code can be used to open a Development Workspace.

X++

static void OpenDevWorkspace(Args _args)
{     int hWorkspace;     hWorkspace = infolog.createDevelopmentWorkspaceWindow();
}

Document Handling in AX – setup and Example

Imparted from Here

Some initial setups for enabling document handling in AX-

On the Tools menu, select Options.
Under Document handling, select Document handling active.
Select Update toolbar line button to highlight the Document handling icon on the toolbar when you select a record with documents references.

Documents are stored in a default document archive directory and before you start creating documents, you must select the location in theParameters form.

Click Basic > Setup > Document management > Parameters.
In Archive directory, type the path to the archive directory, or use the browse button () to select a folder on your network.
Select the Number sequences tab.
In the Number sequence code list, select the number sequence to use for naming your documents.

The document management system handles several types of documents including letters, worksheets, and simple notes. Before you can create documents of a certain type, the document type must be created in the Document type form.

By default, all documents are stored in the Archive directory selected on the Parameters form. However you can select alternative folders for the individual document types.

Also by default, all document types are available from all forms, but some document types are only relevant for certain tables, such as, if you only want to create customer letters for records in the Customers form. When you associate a document type with a specific table, it is not possible to create any documents of that type, in other tables.

Create new document type

Click Basic > Setup > Document management > Document types.
Press CTRL+N to create a new document type.
In Type, type a code for the document type.
In Name, type a descriptive name for the document type.
In the Job description list, select the type of document to create.
In the Group list, select a group for the document type.

Now, I would like to explain document handling with an example for sales orders form of DOC type.

Initially set the parameters for document handling.

Go to – >Basic -> setup -> Document Management – > Parameters form

set the archive diretory path ( where the document has to be stored like c:\AxDocuments). Remember when ever u create document for a record, the document gets stored in the above location specified.

Check – use Active document table checkbox.

In the number sequences tab - select the number sequence you would like to use for the documents.

Then, If you want to enable documents for salestable – Go to – > Basic -> setup -> Document Management – > Active document tables form . Then select the name of the table here as salestable and in enable the always enabled checkBox.

Now when you open the salestable form you can find the document handling enabled on the toolbar for the salestable form. Double click the document handling icon and create a new document for that record by clicking the new button and selecting the Document menuitem button.Now you can create documents for the salestable.Once you create documents the documents will be stored in the archive path selected in the parameters form.

When ever u create a document, it hits docuref and docuvalue tables.

In the docuref,it creates a record with the tableid of the salestable, the record id of the salestable and the dataareaid ..etc..and correspondingly a record gets generated in the docuvalue with all the filenames, extensions,path etc

To view the documents in the salestable from itself, i mean in the gird itself here is the way…

Open the salestable form, Then , I would like to use icons for every record in the salestable.So i will write a display method at the salestable level.

//BP Deviation Documented
display smmDocIconNum
showDocHandIcon()

{
#macrolib.resource
;
if ((select firstonly docuRef where
docuRef.RefCompanyId == this.DataAreaId && docuRef.RefTableId ==
this.TableId && docuRef.RefRecId == this.RecId).RecId)

{
return #RES_NODE_DOC;
}

return #RES_AM_NEW;
}

Now create a new window control in the gird. Add the datasource as salestable and datamethod as showDocHandIcon.

The main class where all the business logic is written is docuAction Class. Now i am going to use this class to open the documents for the records.

Now please override the Mouseup() method of the window control

public int
mouseUp(int _x, int _y, int _button, boolean _Ctrl, boolean _Shift)

{
int ret;
args args;
docuRef
docuRef;

;
ret =
super(_x, _y, _button, _Ctrl, _Shift);

element.showDocument();
// Method at form level

return ret;
}

Now add showDocument() method at form level

void showDocument()
{
args args;
docuref docuref;
;

args = new args();
docuRef =
docuref::find(salesTable.dataAreaId,tablenum(SalesTable),salesTable.RecId,today());

args.record(docuRef);
args.parmEnumType(enumnum(Docucode));
args.parmEnum(Docucode::Open);
docuaction::main(args);
}

NOW YOU CAN VIEW YOUR DOCUMENTS FROM THE GRID ITSELF BY DOUBLE CLICKING THE WINDOW CONTROL.