Leader Board

Walkthrough: Adding an X++ Object to a Visual Studio Project [AX 2012]

This walkthrough illustrates the following tasks:

  • Creating the class library, adding a Microsoft Dynamics AX table to the project, and accessing that table from code.

  • Creating a console application project and testing the generated assembly.

TipTip: Although this topic shows you how to test the generated assembly from Visual Studio, you can also test it from X++ because after you add the project to the AOT, the classes in the assembly are available from Microsoft Dynamics AX.

Prerequisites

To complete this walkthrough you will need:

  • Microsoft Dynamics AX with Visual Studio Tools and sample data installed

  • Visual Studio 2010

Creating the Class Library

The first step is to create the class library in Visual Studio. After you have created the class library project, you can then add a Microsoft Dynamics AX table to the project. Then you can create class methods that access that table.

To create the class library
  1. To create a new class library project, click File > New> Project.

  2. Below the Installed Templates tree, click Visual C# > Windows, select the Class Library project type and then click OK.

  3. Save the new project.

  4. Add the project to the AOT by clicking File > Add ClassLibrary1 to AOT. Notice that the project icon changes in Solution Explorer. Alternatively, you can right-click the ClassLibrary1 project and select Add ClassLibrary1 to AOT.

To add a Microsoft Dynamics AX table to the project
  1. Open the Application Explorer by clicking View > Application Explorer. Expand the Data Dictionary > Tables node and locate the CustTable table.

  2. Click the CustTable table and drag it onto the project in Solution Explorer. Alternatively, you can right-click the table and then click Add to Project. In Solution Explorer, you can see that the table and a proxy to the CustTable table are created internally by the system. In the References node you can see a reference to the assembly Microsoft.Dynamics.Ax.ManagedInterop.

    TipTip: You can add a system table or system class to your Visual Studio project even if the  interface does not support the dragging of system objects. For example, to add the FormRun system class, first add any application class, such as the Bank class. Then rename the new proxy node from Class.Bank.axproxy to Class.FormRun.axproxy.

To create methods that use the table
  • Open the Class1.cs file and add the following code. This code contains two methods that each take two parameters and return data for the specified customer.

    C#

    using System;

    namespace ClassLibrary1
    {
    public class Class1
    {
    public string GetCustomerPaymentMode(string accountNum, string dataAreaId)
    {

    string paymentMode = String.Empty;
    CustTable custTable = new CustTable();

    // Search for the customer.
    custTable = CustTable.findByCompany(dataAreaId, accountNum);

    if (custTable.Found)
    {
    // Get the value for the customer's payment mode.
    paymentMode = custTable.PaymMode;
    }

    return paymentMode;
    }

    public bool GetCustomerCreditLimit(string accountNum, string dataAreaId)
    {

    bool hasCreditLimit = false;
    CustTable custTable = new CustTable();

    // Search for the customer.
    custTable = CustTable.findByCompany(dataAreaId, accountNum);

    if (custTable.Found)
    {
    // Get the value for whether the customer has a credit limit.
    hasCreditLimit = (custTable.MandatoryCreditLimit == NoYes.No ? false : true);
    }

    return hasCreditLimit;
    }
    }
    }

Creating a Console Application Project


To create a console application project to test the assembly


  1. In Solution Explorer, right-click the solution ClassLibrary1 and select Add > New Project.


  2. Below the Installed Templates tree, click Visual C# > Windows, select the Console Application project type and then click OK.


  3. In Solution Explorer, add a reference to the ClassLibrary1 project by right-clicking the References node under the ConsoleApplication1 project and then clicking Add Reference.


  4. Click the Projects tab, select the ClassLibrary1 project and then click OK.


  5. In Solution Explorer, add a reference to the managed interop assembly by right-clicking the References node under the ConsoleApplication1 project and then clicking Add Reference.


  6. Click the Browse tab, locate the Microsoft.Dynamics.AX.ManagedInterop assembly and select OK. This assembly is located in the Client\Bin directory. For example, C:\Program Files (x86)\Microsoft Dynamics AX\60\Client\Bin. This reference is necessary to use the Session object.


To call methods to display output to the console application


  1. Open the Program.cs file and add the following code. This code calls the GetCustomerPaymentMode and the GetCustomerCreditLimit methods from the class you created and displays the values in the console window.


    C#

    using System;
    using ClassLibrary1;
    using Microsoft.Dynamics.AX.ManagedInterop;

    namespace ConsoleApplication1
    {
    class Program
    {
    static void Main(string[] args)
    {
    // Create a session
    using (Session session = new Session())
    {
    session.Logon(null, null, null, null);

    Class1 class1 = new Class1();
    string accountNum = "3003";
    string dataAreaId = "ceu";
    string paymentMode = String.Empty;
    string hasCreditLimitText = String.Empty;
    bool hasCreditLimit;

    // Get the customer payment mode and credit limit.
    paymentMode = class1.GetCustomerPaymentMode(accountNum, dataAreaId);
    hasCreditLimit = class1.GetCustomerCreditLimit(accountNum, dataAreaId);
    hasCreditLimitText = (hasCreditLimit == false ? " and does not have" : " and has");

    // Write the data to the console
    Console.WriteLine("Customer " + accountNum + " in company " + dataAreaId +
    " has a payment mode of " + paymentMode + hasCreditLimitText +
    " a mandatory credit limit." );
    Console.ReadLine();
    }

    }
    }
    }


  2. In Solution Explorer, set the console application to be the startup project by right-clicking ConsoleApplication1 and then clicking Set as StartUp Project.


To test the generated assembly


  • Run the application. If you have the sample data installed, you will see the following output in the console window:


    Customer 3003 in company ceu has a payment mode of CHCK and does not have a mandatory credit limit.


    TipTip: You may receive an error about the .NET target framework because both projects target the .NET Framework 4 by default but the Microsoft.Dynamics.AX.ManagedInterop assembly is a mixed-mode assembly that targets the 2.0 runtime.


    To resolve this error you have two options: you can change the target framework for both projects to .NET Framework 3.5 or you can add an attribute to the app.config file of the console application project. To change the target framework, right-click each project in Solution Explorer and then click Properties. In the Target framework field, select .NET Framework 3.5.


    If you want the console application project to target the .NET Framework 4, add the useLegacyV2RuntimeActivationPolicy attribute to the startup element in the app.config file and set it to true. For example, <startup useLegacyV2RuntimeActivationPolicy="true">.

Integration with X++ Objects from Visual Studio [AX 2012]

Proxies

Proxies enable you to add an AOT element to your project in Visual Studio so that element can be accessed by managed code. When you add an AOT element to a project by using Application Explorer, a proxy for that element is created internally by the system.

The AOT elements that you can add to a managed code project are as follows:

  • Classes
  • Tables
  • Enums

After you add the AOT element to your managed code project, all the methods and properties are available through IntelliSense. For more information, see post “Walkthrough: Adding an X++ Object to a Visual Studio Project”

A typical scenario for adding an X++ object to managed code is when you identify managed code functionality that you want to call from X++. This functionality may already be located in managed code or the development scenario may require that it run in managed code.

For example, you might want to have your Microsoft Dynamics AX installation updated with customer data from an external system. In this case, you create an X++ job that is scheduled to run periodically and calls a managed code class method. This method could then check for the external data and then call the appropriate CustTable methods to update the customer data (see the following diagram). Because the managed code that you write runs in the Microsoft Dynamics AX process, that code will typically be in a class library project.

The following diagram provides a high-level view of the integration of X++ and managed code. The initial call from X++ to managed code can originate from either an X++ .NET interop call or from an event handler.

Proxies Managed Code Flow

Event Handlers

In the AOT, you can associate a class method with an event handler. An event handler is code that runs before the associated method runs or after the associated method has finished running. The event handler itself is also a class method, and it can be written in either X++ or managed code.

For example, you may have an X++ class method called MyClass.myMethod, and you have managed code that you want to run after the MyClass.myMethod method has finished running. In this case, you would create an event handler class and method in managed code, such as MyEventHandlerClass.PostmyMethod. This event handler contains the code that will execute after the MyClass.myMethod method is called.

When you add an event handler in Visual Studio, the system automatically creates a method that begins with either “Pre” (for event handlers that run before the method runs) or “Post” (for event handlers that run after the method completes). An event handler subscription is also automatically added to the MyClass.myMethod method. In addition, the properties of that subscription are set to point to the managed code class method. After the MyClass.myMethod method has finished running, then the MyEventHandlerClass.PostmyMethod event handler code executes. Event handlers can only be associated with a class in the AOTClasses node.

The following diagram illustrates how a managed code post-event handler is called. You can create the managed code class method and configure the event handler in the AOT to call that class method all from Visual Studio. For more information, see post “ Walkthrough: Creating an Event Handler in Visual Studio.”

Managed Code Event Handler Flow

Managed code post-event handler flow

Conclusion of Reporting in AX 2012

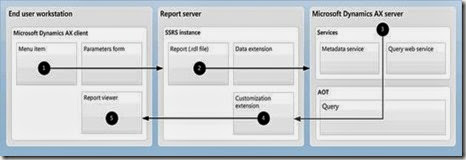
The SQL Server Reporting Services (SSRS) reporting architecture in Microsoft Dynamics AX 2012 is modified to follow a Model-View-Controller (MVC) design pattern variation. This architecture means many different client types can call Microsoft Dynamics AX 2012 SSRS reports including: Microsoft Dynamics AX clients, Enterprise Portal, and Batch Job.

Reports now use services instead of the .NET Business Connector to retrieve Microsoft Dynamics AX online transaction processing (OLTP) data.

Reporting Architecture

clip_image002

Microsoft Dynamics AX enforces security on all data returned. If the user who is running the report is not allowed to see a specific field, the data for that field is not returned.

Reporting Services offers several approaches for deploying server components.

Scale-out deployment: A report server scale-out deployment is two or more report server instances that share a single report server database. A scale-out deployment enables you to increase the number of users who concurrently access reports and improve the availability of the report server.

Failover cluster: SQL Server provides failover clustering support so that you can use multiple disks for one or more SQL Server instances.

Failover clustering is supported only for the report server database; you cannot run the Reporting Services Windows service as part of a failover cluster. .

Some reports use online analytical processing (OLAP) cubes to access data. The default OLAP cubes that are provided with Microsoft Dynamics AX require full license and configuration keys. When you turn off license or configuration keys, data is removed from corresponding columns in the online transaction processing (OLTP) database. As a result, cubes cannot access the data they were designed to retrieve. This means that you may see errors displayed in reports and Role Center web parts that use cubes as a data source. You will need to modify these reports and web parts so that they no longer try to retrieve data from a column or field that contains no data.

To install the reporting components in Microsoft Dynamics AX 2009, you had to install the reporting extensions when running the Setup wizard. For Microsoft Dynamics AX 2012, the Setup wizard is changed. It no longer includes an option for installing the reporting extensions. When you run the Setup wizard for Microsoft Dynamics AX 2012, you can install the business intelligence components.

Microsoft Dynamics AX includes many default reports that you must deploy to Microsoft SQL Server Reporting Services. If you did not deploy the reports when you installed the Business Intelligence components, you can use Windows PowerShell to deploy the reports.

Report deployment has moved to PowerShell from the Microsoft Dynamics AX 2009 Reporting Project Deployment form.

To deploy all reports, enter the following command: "Publish-AXReport –ReportName *", and then press Enter.

To deploy a specific report, enter The following command which used to deploy the CustTransList report: "Publish-AXReport –ReportName CustTransList", and then press Enter.

To Retrieve information about the default reports enter the following command: “Get-AXReport -ReportName *", and then press Enter.

Modify the list so that only the Name and ChangedDate fields are displayed by entering the following command: "Get-AXReportName * | Select- Object Name,ChangedDate" and then press Enter.

To filter list of all report which retrieved in previous command and get only specific reports are listed. For example, to filter the list so that only the reports that contain the word CustTrans are listed, enter the following command: "Get-AXReportName * | Select-Object Name,ChangedDate | Where { $_.Name –like "CustTrans*" }", and then press Enter.

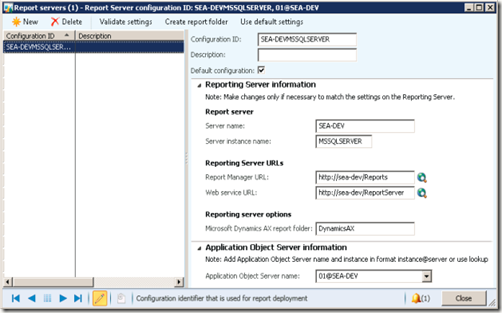
Configure Report server

clip_image004

To grant users access to reports, you must configure security settings in Microsoft Dynamics AX and in Microsoft SQL Server Reporting Services. The following sections describe the tasks that you must complete in each application.

Configure security settings in Microsoft Dynamics AX

Complete the following tasks in Microsoft Dynamics AX:

• Determine which reports each Microsoft Dynamics AX role should have access to.

• Verify that each Microsoft Dynamics AX role has the correct duties and privileges assigned to it in order to access the reports.

• Assign users to Microsoft Dynamics AX roles.

• Secure the data shown in reports.

Configure security settings in Reporting Services

Complete the following tasks in Reporting Services:

• Assign users to the DynamicsAXBrowser role in Reporting Services.

• Identify the account that is used to run the Application Object Server (AOS) service and the account that is used as the Business Connector proxy. Assign those accounts to the DynamicsAXBrowser role in Reporting Services.

• Restrict access to report folders and reports. Reporting Services includes security features and tools that you should use to help control access to report folders and published reports.